Thursday, 21 November 2013

DIY Double-Sided Earrings

Hi Lovelees!


My heart literally stopped when I saw these Dior double pearl earrings. And when one of my favorite DIY blogs, A Pair & A Spare, posted a tutorial to make them, I dropped everything and started right away. Unfortunately, I didn't have the perfect size of pearl beads, and I was too impatient to wait to go to Michaels the next day. So I improvised! And sometimes, improv turns out even better...


Materials:

- 1 pair of pearl earrings
- 2 rubber earring backs
- 2 wooden cube beads
- a CD

- e6000 glue
- sharp scissors
- marker

- optional: white acrylic paint and a thin paintbrush

Instructions:

1. Using a toothpick, put a small dot of glue into the hole of the bead.

2. Press the earring back into the hole. Repeat with the other bead. Let dry for 20-30 minutes.

3. You could be done right here, with a pair of pearl and wood double-sided earrings! But I went a step further by using a CD to make them iridescent/holographic. Cut the CD in half. Be careful!

4. At the cut edge, gently separate the CD into two. One side should be just clear plastic, and the other side will have the shiny stuff. Discard the clear plastic.

5. Trace the sides of the bead onto the non-shiny part of the CD with a marker. Cut the squares out. Remember, you don't need to cover the side with the earring back!

6. Glue the small CD squares onto the bead. Repeat with the other cube.

7. Let dry for at least 1 hour.

8. I painted the edges and the tops of the beads with white paint to polish it up, but that's up to you!


And now you have pearl and iridescent double-sided earrings! I love how they look perfect from every angle. I legit wear them everyday; they're casual, elegant and edgy all at the same time. Give them a try and let me know how it goes! Thanks for visiting!

Love,
Rachelle
@RachelleMLee     @MakeYouLoveLee

Wednesday, 6 November 2013

DIY Statement Beanie

Hey Lovelees!

So the weather here in Edmonton has taken a turn, which means it's time to bust out the beanies! Ah, something fashionable and cool. Statement beanies have been popping up everywhere, but I thought I would give it my own spin by adding some tasteful bling. Try this easy fix to spice up a plain, kinda boring, black beanie.


Materials:
- beanie
- necklace (I used this one, and similar here)
- needle and thread (try using embroidery thread if you can, it makes things quicker and easier)
- optional: pliers

Instructions:
1. Slide the letter beads off of the chain. Depending on the necklace you choose, you may need to remove the clasp in order to take the beads off. The pliers should do the trick.

2. Lay your beanie flat and position the letters.

3. Once you're happy with the look, it's time to sew them on. I used about 2-3 stitches per letter with the embroidery thread. If you're using regular sewing thread, the more the merrier!


And that's it! I gotta say, I'm quite impressed with myself. So easy but it still looks so cool and chic.There are tons of other inexpensive pendants and charms out, so go crazy people (what do you think of using this?). Give it a shot and please let me know how it goes!

Love!
Rachelle
@RachelleMLee @MakeYouLoveLee


Monday, 23 September 2013

Dark circle fix - a review of Priori Coffeeberry Eye Radiance serum

Hello Lovelees,

Today I would like to rave about my new eye serum. - Priori Coffeeberry Eye Radiance serum 15mL.


If I had to pick something that I believe is my biggest flaw if I go out with a "naked" face, it would be my dark circles and bags around my eyes.

I may not be the cutest giant panda around but I'd make that red panda a good run for its money.

I choose to compare myself with an animal instead of showing a picture because I don't know if my portrait will show it enough...It has like a purplish/grey undertone to it. Not very flattering. My mum has on one occasion said it was my makeup (presumably smokey eye look) gone wrong when I fought back defiantly with the line "You're WRONG cos I didn't wear any makeup today and cos all the other days I DID and it was so good you couldn't tell!"
The rest of the occasions she believes I didn't take off my makeup properly. Also wrong.

If you would like to see how I cover my flaws please check this post on concealers (tips and tricks here  ) and here (massive review here).

Cut to the chase :I LOVE Priori Coffeeberry Radiance Eye Serum !!  I found it off watching youtube of Avaliu (an HK singstar and beauty guru).  She speaks mainly in Cantonese and she has an online beauty store that sells the brand Priori so she was recommending and promoting the stuff. There may be vested interest but you have to give it to her when she talks she sounds extremely knowledgeable and convincing and believes in the products she stocks.  I bought my serum from amazon though haha.

Basically from what she said (in rough translation) was that coffeeberry stimulates the circulation of the fine capillaries around your eyes to reduce the puff and darkness.  Why stimulating circulation is important is because the darkness is basically from the bloodcells gathering in the capillaries and breaking down under your eyes and lingering there producing dullness.  When you apply the serum it produces this kind of heat around your eyes that also helps circulation.  The worser your circulation, the warmer it is so after prolonged use this heat should be less because your eye circulation should be better.

There are other gurus that talk about what causes the dark circles and the most often causes pointed out are:
  • allergies (rubbing eyes)
  • poor diet
  • lack of sleep
  • genetics 
  • UV 
For me I'm going to say ALLERGIES are my main enemies.  My right eye circles or worse than left, because I rub my eyes more on the right. Bad Connie.

I have no "before and after " pic sorry that will do enough justice as the difference is subtle at this stage and it's only been a month.  This stuff is not cheap but anecdotally I have already bought a second bottle because I think it has made a marked difference in the one month I've been using it!

I love the super light silky texture - it absorbs quickly, easy to spread.  Another plus about this serum is that it is so light in texture and absorbs so well I could be blending my eye makeup over it and it does not "roll up" like other eye creams and gels might.

The colour is not the most flattering as it comes out brownish (does not stain skin from what I can tell personally), and the smell is unusual as it is not the usual light fragrance we encounter in skincare products, but strongly smells of the coffee/coffeeberry extract.  Takes some getting used to overcoming these prejudices but it is not major!  They say it is fragrance and colorant free (I assume that meant no SYNTHETIC fragrance/colours).

I don't have many fine lines YET for it to be my chief complaint to monitor it's other capabilities...but it hasn't gotten any worse that i've noticed in that time?

From the Priori website and official stockists it says it is 99.2% natural and fortified with 0.5% coffeeberry extract providing one of nature's most potent antioxidant protection.  This fights free radicals which cause skin ageing.  They say it suits all skin types.

That last claim I might debate about suiting all skin types, it can suit - but I think if you need more moisture and have mature skin you might need to have something else to supplement it to be BETTER.

In conclusion - it is an unusual product in that it also "warms" up your eyes, not necessarily cheap but I have bought a second bottle already because I think it is effective in reducing dark circles!

What's your favourite eye serum /cream and why?

Till next time!
;)Connie
Follow on Twitter @makeyoulovelee and Facebook 


Friday, 20 September 2013

DIY Knit Shorts

Hey Lovelees!


I don't have any new DIY tutorials today because I was working on these awesome knit shorts! Yep, I knit these babies all by my self. It took quite some time, but the actual knitting pretty easy. I followed this simple pattern from Scarffaces and I parked myself in front of the TV for the whole week. Pretty time-consuming, but I think they're worth it. They turned out even better than expected and they are perfect for the fall weather right now! What do you guys think of these?


- Rachelle
@MakeYouLoveLee @RachelleMLee

Thursday, 5 September 2013

DIY Spherical Earrings

Hey Lovelees!


I'm back from an amazing experience interning in New York, and I thought of so many new projects while I was there! This particular project was inspired by these earrings from European brand & Other Stories. The only way to buy them was to fly to Europe, so I came up with this DIY instead. I saved a lot of money, and now you can too!

Materials:

- silver-plated plastic beads in varying sizes (I stuck to 2 sizes, but it's completely up to you!)
- 2 silver earring posts
- 2 earring backs
- e6000 glue

Instructions:

1. Arrange the beads into whatever pattern you like. I took a picture of the order to reference later on.

2. Glue the beads together. Make sure the holes of the beads are facing inward to get the full spherical effect.

3. Leave to dry.

4. Glue the earring posts. For stability, attach them to a larger bead in the cluster. Let dry and add on the earring backs.


And that's it! So simple and easy, but they end up looking so elegant and classy. You could also use copper beads to imitate the original ones, or try gold beads too! If you try this out, please send us a picture!!

Rachelle
@RachelleMLee @makeyoulovelee
And like us on Facebook

Friday, 19 July 2013

Smoke it up - *gasp* even in the daytime! For EYES ONLY

Hello Lovelees!
Long time no see!
Rachelle's gonna have amazing stories to tell when she's back from New York from her internship, but she has had to put her projects on hold since her tools etc are all here in Edmonton haha.
Meanwhile I've been really busy with work, relocating and organising cos our office has just moved to be bigger and better yay!

Anyways suddenly I had an itch to do a tutorial one day (it does help that a few people have been asking why I've been MIA...) because I came up with a smokey daytime look that I really like!!

Usually I am the lazy variety with just BBcream, eyeliner , mascara and blush. Eyeshadow is an optional and can be time consuming thing - just cos with my Asian hooded eyes - there's a lot of finesse  and "special effects" needed to make it extra dimensional and flattering, than our usually flat faces, features and eyes. When you do it right though - it would look amazing, you would feel amazing and ...in this case I felt sophisticated haha.

I chose slate today because it's dark enough to not be black, it almost gives a grey smokey look without actually being grey but that it's bluish to add some interest and keep it looking casual but mature.


Here's the tutorial - Enjoy!:


Products used:

Kat Von D High Voltage Eye Primer
Neutrogena Nourishing Eyeliner in Twilight Blue
Lorac Pro Palette  -eyeshadow- Slate
MAC eyeshadow- Soft Brown
Loreal Lineur Intense - Black Mica
Sephora Pantone Universe Foiled waterproof eyeliner in Rose Gold and Silver

I am crazy with mascaras - I now use 3 concurrently:
Upper lashes: Buxom Lash mascara for the volume and length with nourishing ingredients as a base, then waterproof Maybelline Full n Soft mascara to add even more volume set my curl and make more water/smudge resistant
Lower Lashes - Clinique Lash Power mascara.


The key to keeping it as a daytime look is that you don't lay the colour too far up your eyelid, the blue should end just below the crease and then your transition blending colour goes right into the crease (socket) and not much further past.  I also put the light foiled eyeliner under the lower lash line to lighten up the look and create a bright innocent eye.  Try to keep your eyebrows relatively full but not too densely filled.


If you were to transform it to evening look then you would basically extend the colours further out past your lids, rim your waterlines with black kohl pencil, add some falsies and replace the light coloured pencil under the lower lash line with a dark drop shadow instead.  For the rest of your face you should also contour more, fill your eyebrows darker and more arched with highlights.

Pair those eyes with a light peachy cheek and nude lips so that the focus are on your eyes.  I think this look is appropriate for work especially if you often wear some power suits or any winter appropriate outfit.   It's definitely a more mature look. If you had a bright cheery summer outfit then this is probably not the "cutest" look to go for haha.  Depending on your smile - you can technically still try to pull the cute look off! haha eg:


;)Connie
Share and like us on Facebook!


Saturday, 1 June 2013

3 steps to convert wimpy lashes to REAL long and healthy lashes!! (no falsies)

Hello Lovelees

I want to share with you guys one of my favourite eyelash looks lately. Rachelle and I have been quiet because we just came back from our mediterranean cruise holiday ! yay!

How to batter eyelashes that are real! It's a 3 step approach but it DOESN'T INVOLVE FALSIES!!

RIGHT EYE with my 3 steps, LEFT EYE natural

STEP 1 - Nutraluxe Lash (MD)


Nutraluxe Lash MD


This is a serum that you paint along your eyelashes like you would a liquid eyeliner.  It shows real results in 2 weeks if you apply twice a day. It thickens and lengthens your eyelashes.  It can be applied to eyelashes or eyebrows in areas you feel are sparse.  It only thickens hairs and follicles where it already exists and not in places where follicles were never present. So eg if it is a scarred area or you are naturally not so hairy it may not have the desired effect.  This is not an individual downfall of the product but any "lash stimulating" product on the market is limited by your natural number of hair follicles.

 Actually the instructions say just use once a day.  A beautician in Hong Kong introduced it to me a couple years ago and she was raving about how she tried tons and this one actually works and shows results fast! She told me to apply twice a day to get it going.  After I noticed results I went back to once a day (as recommended by manufacturer) for maintenance.

All lash enhancing serums work on including a prostaglandin in the ingredient which are also included in glaucoma medication eyedrops.  In optometry school we used to learn that a side effect of the prostaglandin eye drop in the treatment of glaucoma disease is that it may darken the eye area and also cause thicker eyelashes.  My optometry friends (girls) and I always thought that wasn't so negative a side effect, most of us were asian anyway- darker eyes than we already had was not an issue.  Our usually wimpy short lashes however...were.  We just didn't know that a couple years later that doctors would use this in a cosmetic application safely - for real!  The first and most recognized drug/application for lash enhancement was actually Latisse.  It requires prescription from your doctor but I think it is more a matter of request rather than the doctor denying you of it.  It was not a particularly affordable product though.

Later the market is flooded with a variety of products that claim the same effect.  I won't say they don't work but I can't be sure either.  Feedback is very mixed.


STEP 2- Etude House Lash Perm Primer Basecara
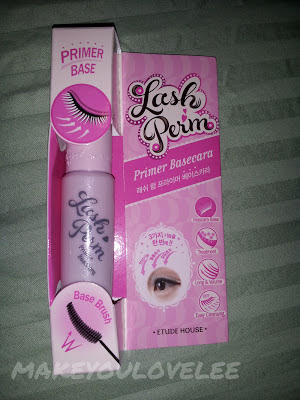
Etude House Lash Perm Primer Basecara

LOVE this stuff.  It has a bent smiley face wand that helps curl lashes as you apply and the basecara is a greyish substance.  On the box the English description says it is a lash conditioning undercoat that has a unique polymer  that helps mascara stay on for a longer fuller look.


You can see that it probably helps build your lashes to be longer by extending it with little 'fibres' as the basecara dries in little "spikes".

You apply it like mascara, one coat of it before you apply the actual mascara.  You do not need to particularly wait for it to dry.

I find the basecara really helps separate the lashes when I'm using Lashionista (Maybelline mascara).  Without it the Lashionista still gives similar length but the lashes will tend to clump in longer spikes rather than having separated dense looking set of lashes.

Basecara also claims it helps mascara wash off easier.  I tend towards non-waterproof mascara anyway so washing it off was never an issue.  I think it does help A LITTLE in washing/removing waterproof mascara long as you are not applying too many coats of mascara...So in short - it KINDA works but don't count on it to be magic.

When I use this basecara - I mainly like it because it helps (in order of favourite advantages)
1. condition lashes
2.add volume and length without clumping
3.curl
4.base to help cleaning mascara off a bit easier.

I usually only use mascara with good smudge-resistance anyway when it is used alone so I don't necessarily rely on it for helping mascara "stay on longer" as their advertised advantage.


STEP 3 - Maybelline Lashionista Mascara

It doesn't seem to be available on the Canadian (maybe even USA??) market at the moment even though it is by Maybelline NEW YORK but it brags in Hong Kong to be the number 1 selling mascara in Japan.  In Hong Kong youth culture we often are drawn towards Japanese or Korean beauty, pop and fashion as the trend setters so I decided to buy it even though I have a lot of mascara unopened etc lying around at home.

It might be  a drugstore mascara but surprisingly if I convert the currency from HKD back to CAD I almost pay the same if not maybe a little more for my Clinique mascara. Go figure.  But I actually think it's worth it.

It's effect is extremely similar to the Clinique Lash Power that I have written about before here.  But this is even BETTER.

Top with flash - you can see fibres on the brush, bottom without flash: see the little fibres out of the mouth of the tube?


So in short it is oil and moisture resistant and doesn't/smudge onto my eyelids as the day goes by.  It extends the lashes by almost..."attaching" these fibres that you can see forming as you pull the brush out of the tube and see the excess mascara gathering on the mouth of the tube is spikey fibre like.  When you brush through it's almost like attaching these fibres along the length of your lashes and then building on itself after that.  As with any other structure if it is too 'top heavy" with no real support then it will start crumpling sideways - which is what may happen if you are over ambitious with your application.  With experience you will know when to stop and when it is too many coats haha.


Maybelline Lashionista Mascara
Add caption

I find the Etude House basecara really helps to separate the lashes, avoiding clumping with this mascara.

It will require at least 2 coats.  I curl my lashes after application by resting my lashes on the length of my index/pointing fingers and pushing my finger upwards until the mascara dries and sets (about 10-15s). Ie point your fingers towards the bridge of your nose along the length of your eye,  but have your lashes resting in a bent position on your fingers.  This saves my lashes from  potentially getting damaged or weakened by the clamping action of a curler.

In real life the end result is super cute in the innocent wide eyed way.


If the weather is a little bit humid causing you to lose your curl during the day, or you want to save time with getting the mascara to dry in the curled position by using the method i described above, often I might apply a coat of waterproof mascara on top so that it will set and dry the product underneath faster.  Because you already primed your lashes with non waterproof mascara and only coating the waterproof mascara on the top - end of day cleaning is just as easy, or almost as easy as washing off just the non-waterproof mascara.

Share this if you learnt something and check us out on Facebook!
See if you like and comment!

;)Connie
Follow on twitter @Makeyoulovelee